How to Harvest and Preserve Black Walnuts
Do you have black walnut trees nearby? See how to take advantage of this foraged food by learning when to harvest and how to hull, cure, and store black walnuts.

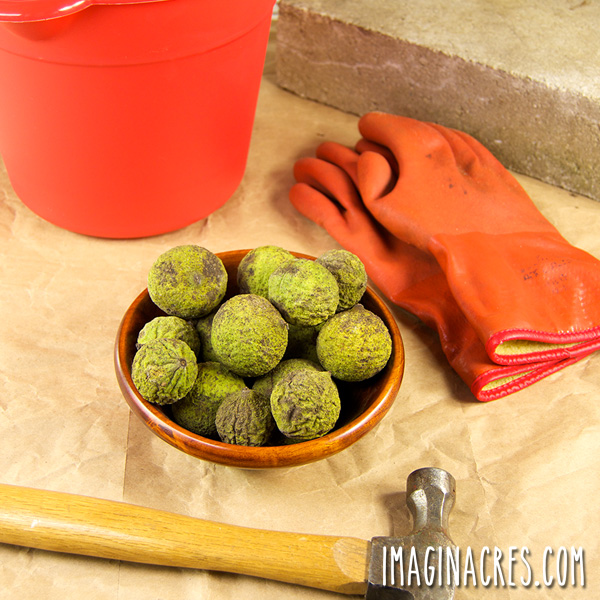
Rich, bold, and unmistakably wild! Black walnuts are one of nature’s most rewarding (and challenging) nuts to forage. If you’re lucky enough to have a black walnut tree in your backyard or nearby, you may find yourself gathering buckets of fallen fruit in early autumn.
But what comes next? From sticky green hulls to rock-hard shells, black walnuts can be intimidating at first. In this guide, you’ll learn how to harvest, hull, clean, dry, and crack black walnuts, and even explore ways to use them in the kitchen and beyond.
About Black Walnuts
In our area, black walnuts begin to mature and fall from the branches in late September into October. We try to gather as many as we can daily before the squirrels and chipmunks snag them all to hide away in their winter storage. Trust me, there is usually plenty for all of us.
The eastern American black walnut (Juglans nigra) is a native tree found throughout the eastern United States and parts of Canada. Hardy to USDA Zone 4, it also adapts well when planted beyond its native range.
Many old farmsteads had at least one or two black walnut trees on the property. Black walnut trees were highly valued as a food source, shade tree, and wood used for fine carpentry work. The hulls of black walnuts were used to make ink, medicine, and as a dye for hides and fiber.
Don’t have a tree of your own? Ask around your neighborhood, you might find someone who would love for you to gather the messy nuts from their yard.
Although foraged black walnuts are free, there is a lot of time and labor involved with shelling, cleaning, curing, and cracking the nuts. It is worth the effort when you taste them, though. Black walnuts have a much bolder walnut flavor than the ones you purchase in the store. So you can use less in your favorite baked goods.
Note on Juglone Toxicity: Black walnut trees produce a compound called juglone, a natural herbicide that helps suppress competing plants. The roots, leaves, and nut husks all contain juglone, which can be toxic to sensitive garden crops like tomatoes, potatoes, and blueberries. Avoid adding walnut hulls, shells, or rinsing water to your compost pile or garden soil.
When to Harvest Black Walnuts
Black walnuts are typically ready to harvest in early fall, usually from late September through October, depending on your location. In general, it’s best to gather them as soon as they start falling from the tree.
If you’re fortunate enough to have a mature black walnut nearby, pay attention to the tree for signs. The leaves will begin to show their fall colors, turning from green to yellow. Then the fruit will fall from the tree when ripe. The ground beneath the tree will be littered with what looks like small green tennis balls.
Once the nuts begin to drop, they’re ready to collect. Don’t wait too long. Wildlife like squirrels and chipmunks love them just as much as we do. We like to take advantage of the foraged walnuts whenever we can and scoop up the fallen nuts from the ground.

How to Tell When Black Walnuts Are Ready
You’ll know black walnuts are mature when the outer hulls begin turning from bright green to a yellowish-green or mottled brown. Ripe walnuts may also show small black spots or bruises on the hull. Grab walnuts that are still mostly green to brown.
To test for ripeness:
- Gently press your thumb into the hull. If it gives slightly under pressure, the nut inside is likely ready.
- Try shaking the tree or tugging gently on a nut. If it comes loose easily, it’s ripe.
- Look for nuts that have naturally fallen. Fallen nuts are generally ready for processing, though they should be gathered quickly to avoid insect damage.
Avoid black, moldy, or rotten nuts that look like they have been on the ground for a while. These will probably be infested with insects and fungus. Also, the longer the husk remains on the walnut after falling from the tree, the more bitter the nut can be because it absorbs the tannins from the fleshy husk.
Tips for Gathering Fallen Nuts
Be mindful of your footing. It is easy for the nuts to hide among leaves and other debris on the ground. Also, watch for falling nuts when you are under the limbs of the tree. It isn’t ridiculous to pop on a bike helmet if you have one.
- Wear gloves and old shoes or boots. The hulls stain skin and fabric easily.
- Use a bucket or basket for easy collection. Keep hulls from crushing others by layering loosely.
- Gather daily if possible. Nuts left too long on the ground are more likely to develop mold or attract pests.
- Sort as you go. Discard nuts that are soft, shriveled, or have large black patches and visible decay.
If you’re collecting a lot of walnuts, you may want to designate a specific container or tarp-lined area for your daily haul to keep things tidy and organized as you move into hulling and cleaning.
How to Remove the Husks
Harvesting the black walnuts is the easiest step. Once the fruit is harvested, you will need to remove the husk, wash the walnuts, and let them cure for several weeks before storing or cracking.
A fleshy outer hull protects the walnut inside. The hull starts out as green, and then turns dark brown as it ages. Inside the husk, is the walnut encased in its shell. Inside the shell is the prize, the nutmeat.
The hull must be removed before curing the walnuts. Try to remove the hull and clean the flesh from the walnut within a few days of harvesting. If the hull is left on, the juices can penetrate the walnut shell and turn the nut bitter. The hull is also easier to remove when it is still soft and fleshy. If you discover the husks are dried onto your walnuts, soak them in water overnight to soften them up.
But be warned: black walnut husks stain everything they touch. You’ll want to prepare before jumping in.
Protective Gear and Stain Prevention
Removing the outer hull is a messy job. Black walnut husks contain a natural dye that will stain your hands, clothes, and anything porous a deep brown. This pigment was historically used for ink and fabric dye.
Here’s how to protect yourself:
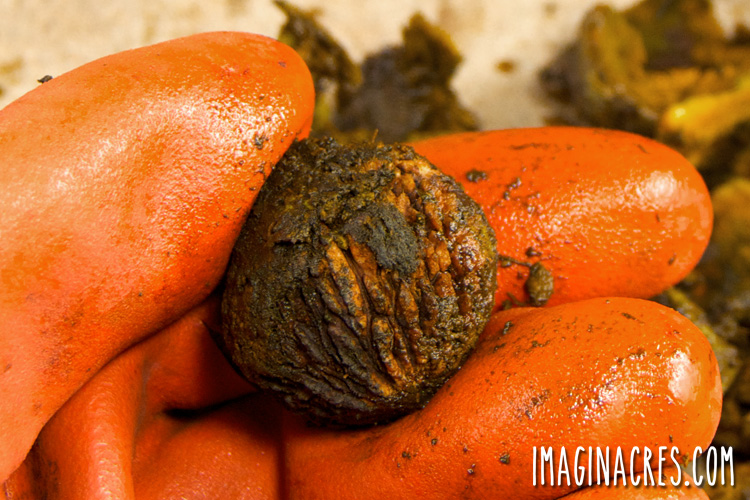
- Wear thick gloves: Use rubber, nitrile, or old gardening gloves that you don’t mind ruining.
- Dress for the mess: Choose old clothing and boots you won’t care about staining.
- Use protective eyewear if you’re using mechanical methods to avoid splashes.
- Work on a disposable or cleanable surface: Concrete, gravel, or a tarp works well.
- Have a designated cleanup area: Set up a hose or bucket of water nearby to rinse your hands and tools.
If you do get stained, scrubbing with a paste of baking soda and lemon juice may help lighten it, but time is the best remedy.
Ways to Hull Black Walnuts
You don’t need fancy equipment to remove black walnut hulls, just a little pressure and patience. You’ll need to experiment with ways to get the husk off to find a method that works well for you. Here are several effective methods:
- Boot Stomp: Place the nuts on a hard surface, such as a gravel driveway, patio, or concrete slab. Step on the nut firmly with your boot to crush and split the husk. Twist your foot slightly to help break it open, then peel off the husk with gloved hands.
- Smash with a Hammer: Place the nuts on a hard surface, then hit them with a hammer to break the hull and make it easier to peel off the rest of the husk. After breaking the skin, roll the fruit on a firm surface until the majority of the husk loosens. Then peel off as much as you can with your gloved hands. If the hull is tough, you can also try using a nail to break through the flesh, and then tear it off with your hands.
- Bucket-and-Auger or Cement Mixer: I have heard of some foragers who have creatively used a cement mixer or a bucket system using a power drill and paint-mixing paddle. Add a bit of water and gravel to help scrub the hulls loose. Always use caution and keep safety top of mind when using mechanical tools.

As you remove the husks, a brownish-yellow liquid will bleed out and stain everything it touches. It can even seep through gloves. It won’t wash off your skin, but will fade over a week or two.
Don’t panic if you see worms or maggots in the flesh of the hull. There are often worms inside the husks that are larvae of the husk fly. It is totally gross, but the larvae won’t penetrate the shell of the black walnut.

How to Clean and Cure Black Walnuts
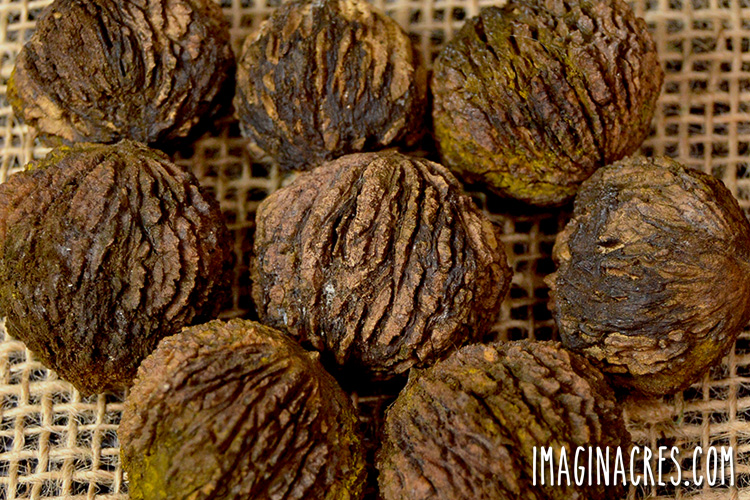
Once the husks are removed, you’ll be left with black-stained, rough-shelled walnuts that need a good cleaning before they’re ready to cure. Cleaning helps remove any residual pulp, dirt, and debris, while curing ensures the nuts are fully dry and ready for long-term storage.
Don’t skip this step! Proper cleaning and drying are essential to prevent mold, spoilage, or off flavors.
Washing and Sorting
Once the husk is removed from the walnuts, scrape off as much of the fibrous flesh as you can from the nut, and then drop them into a container. A 5-gallon bucket works great.
Be careful with splashing water because it will stain. Remember that the black walnut also produces a substance that is toxic to other plants. Be mindful where you dispose of the walnut husks, seeds, and even the rinse water so you don’t kill other plants or contaminate the soil.
Here’s how to wash black walnuts:
- Use a hose with a spray nozzle and high-pressure spray the nuts in the bucket.
- Agitate the nuts with a stick, gloved hand, or a sturdy paddle to help them rub together and break loose the remaining juice and debris. Also, consider scrubbing the nuts with a brush to remove as much of the husk material as you can.
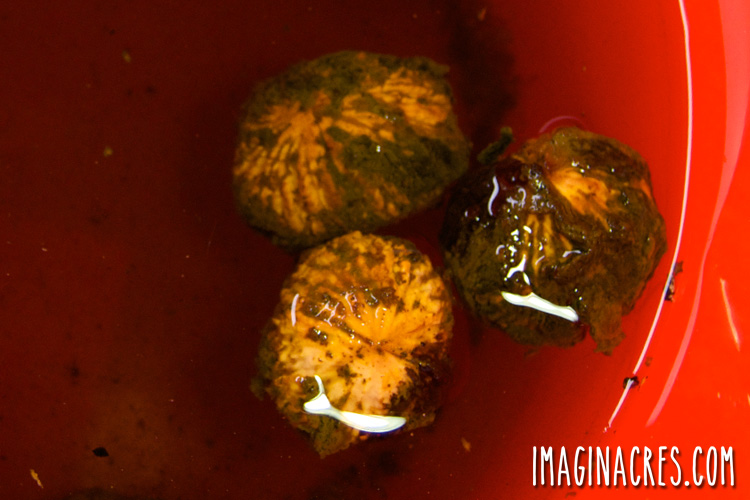
- As you wash, perform a float test. The good nuts will sink. Remove and dispose nuts that float. These contain malformed or immature walnuts that won’t be any good. Discard these.
- Rinse and repeat as necessary until the water runs relatively clear.
Once clean, drain the nuts well and spread them out to dry. A wire rack, old screen door, or hardware cloth frame works well to allow airflow from all sides.
How Long to Dry Black Walnuts
After the black walnuts are hulled and rinsed, they need to cure for a few weeks before storing and cracking. The curing process helps the flavor of the nut develop, and makes cracking the shell much easier. Be sure to cure the nuts in an area where squirrels, chipmunks, or other rodents can’t find them, or you will be left very disappointed.
To cure your walnuts:
- Spread the black walnuts out in a single layer and let the nuts cure in a cool, dry area, out of sunlight, for two to three weeks.
- Ideal conditions are cool, dry, and breezy, such as a garage, shed, barn loft, or covered porch works well.
- Avoid humid or closed-off spaces, which can lead to mold.
Curing time:
- Dry for 2 to 4 weeks, depending on humidity and airflow.
- You’ll know they’re ready when the shells are hard and you can hear the nut rattle slightly inside when shaken.
Once cured, you can store the nuts in the shell or move on to cracking and using the nutmeats.
How to Store Black Walnuts
After several weeks of curing, give the walnuts a shake. If the walnuts are finished drying, you will hear them rattling slightly in the shell. Crack a walnut to test it. The kernel should be firm and snap easily.
Storing black walnuts in the shell: Once the walnuts are cured, they can be stored unshelled in a cool, dry place. Store in mesh bags or baskets for up to a year.
Crack and shell the black walnuts as needed for recipes. You’ll need to crack about two pounds of walnuts for about one cup of walnut meat.
Storing black walnut meat: Black walnuts have a high oil content that can cause them to spoil at room temperature. Once the walnuts are cracked, store the nutmeat in an airtight container in the refrigerator or freezer.
Black walnut meat will stay fresh in the refrigerator for about six months. Frozen walnuts will last about a year. The texture changes when frozen, so they are best used in baked goods.
How to Crack Black Walnuts
Black walnuts are much more difficult to crack than the regular walnuts you buy in the store. I found it impossible to get whole walnut halves from black walnuts. The inside of a black walnut contains several chambers, and the nutmeat itself is embedded in these spaces. But with the right tools and a little patience, you can enjoy their rich, bold flavor in your favorite recipes.
Best Tools for Cracking
Cracking black walnuts takes time, patience, and a bit of creativity. Review your recipes ahead of time and plan on shelling the nuts before starting the recipe. You can store freshly extracted nutmeat in the refrigerator until you are ready to make your recipe.
Although shelling black walnuts can be challenging, the rewards are delicious. Try experimenting with different methods until you find an efficient process that works for you:
- Hammer on a Hard Surface: Place the walnut pointy-end down on a concrete or stone surface. Strike the top firmly with a hammer to split the shell. Then place each half on its thickest side and gently tap the edges to break it into quarters. Use a nut picker or wire cutting pliers to extract the meat from the chambers.
- Smash with a Brick or Rock: For a low-tech approach, place the walnut on a hard surface and strike it with a brick or large rock. This can work well for small batches.
- Use a Bench Vice: If you have a bench vice in your workshop or garage, put it to work cracking walnuts. Place a shallow container beneath the vice to catch walnut pieces and shells. Position the black walnut in the vice lengthwise. Slowly increase the pressure until the walnut shell breaks. Usually, the walnut will crack along the seam. Repeat the process with each half.
- Vice Grip Pliers: Adjust the jaws to be just slightly smaller than the walnut, then clamp down along the seam until the shell cracks. This method offers more precision than smashing and can be easier on your hands.
- Invest in a Black Walnut Cracker: If you process large quantities each year, a dedicated black walnut cracker is worth the investment. These heavy-duty tools save time and effort and can produce cleaner pieces of nutmeat.
Be sure to sort through the black walnut meat very carefully and remove all shells.

How to Use Black Walnuts
Black walnuts have a rich, earthy flavor that’s bolder than English walnuts, making them perfect for rustic recipes, savory dishes, and old-fashioned treats. Once cracked and picked, the nutmeats can be used in:
Cooking and Baking Ideas:
- Black Walnut Cookies or Fudge: Add chopped walnuts for a rich, nutty twist. Try adding them to this recipe: Mocha Chocolate Chunk Cookies.
- Oatmeal Topper: Toast and sprinkle over oatmeal for a bit of texture.
- Homemade Ice Cream: Stir into vanilla or coffee ice cream for a gourmet crunch.
- Black Walnut Pesto: Blend with garlic, herbs, and oil for a bold pasta topping.
- Banana or Zucchini Bread: A classic pairing that brings out the walnut’s complexity.
- Homemade Black Walnut Extract: Capture the flavor of black walnuts in liquid form for baking and flavoring liqueurs.
Frequently Asked Questions
How do I know if black walnuts are ready to harvest? The outer hull will begin to soften and may turn yellow-green or brown. A ripe walnut should give slightly when pressed and fall easily from the tree.
What’s the easiest way to remove the hulls? The simplest method is to stomp on them with old boots on gravel or grass, then remove the husk by hand while wearing gloves. Be warned—they stain!
Why do some of my walnuts float in water? Floating walnuts usually have insect damage or dried-out nutmeats. Discard floaters and keep the heavy sinkers.
Can I store black walnuts in the shell? Yes! They can last up to a year in a cool, dry place. Crack as needed for fresh nutmeats, or freeze cracked nuts for longer storage.
Is there an easier way to crack black walnuts? A hammer works, but dedicated black walnut cracker or lever-style walnut tools make the job faster and safer.
Are black walnut trees toxic to other plants? Yes, they release juglone, which can inhibit the growth of sensitive plants like tomatoes, potatoes, or blueberries. Keep that in mind if you’re composting shells or hulls.

How to Harvest and Preserve Black Walnuts
Ingredients
- 1 dozen black walnuts
Instructions
- Gather black walnuts from beneath the trees. Grab walnuts that are still mostly green to brown. Avoid black, moldy, or rotten nuts that look like they have been on the ground for a while.
- Remove the outer husk. Wear old clothing and gloves to protect from staining. Smash the walnuts to break the skin, and peel off as much of the husk as you can.
- Wash the hulled black walnuts in clean water. Scrub with a brush to remove the remaining husk and juice. Discard walnuts that float.
- Spread the washed black walnuts out in a single layer, and let the nuts cure in a cool, dry area, out of sunlight, for at least two or three weeks.
- Test the black walnuts to check if they are finished curing. Shake the nuts. You should hear the nut rattling in its shell. Crack one and taste it. If the shells are brittle and the nutmeat firm, they are cured.
- Store the cured black walnuts in their shell in mesh bags or baskets in a cool, dry place for up to a year. Shell the black walnuts as needed for recipes.
- Once the walnuts are cracked, store the nutmeat in an airtight container in the refrigerator for six months, or freezer for up to a year.
- You'll need to crack about two pounds of black walnuts in the shell to yield about one cup of walnut meat.
Nutrition
From Tree to Table: A Forager’s Reward
Processing black walnuts takes time, effort, and patience, but the results are well worth it. With every nut you crack, you’re not just saving money or gathering food, you’re participating in a long tradition of foraging and self-reliance. Whether you bake them into family recipes, or enjoy snacking on a handful now and then, black walnuts are a rewarding gift from the land.
If you’re inspired to explore more wild foods, check out our Fall Foraging Guide: Berries, Fruits, and Nuts for Cooler Days or learn the basics in our Beginner’s Guide to Safe Foraging for Food. The wild world is full of edible treasures just waiting to be discovered.
Further Reading and Resources
Want to go deeper? Here are a few trusted resources with additional information about black walnut harvesting, safety, and culinary use:
- Black Walnut Toxicity to Plants, Humans and Horses – Richard C. Funt, Jane Martin
- Preserving Fresh Walnuts to Maintain Nutritional Content – Diane Rellinger, Michigan State University Extension
- Using Black Walnuts – Jane Hart, Michigan State University Extension


This was so detailed and informative and included lots of helpful hints! Thanks for sharing this information in such an easy to understand format, including WHY you want to do things a certain way.
This is a very interesting article. I wasn’t sure that black walnuts are edible but the work involved is rather intense. No wonder the squirrels love them.