Candling Chicken Eggs: What to Look for on Day 5 and Day 7
Candling chicken eggs is easy with the right tips. Discover what healthy development looks like on day 5 and day 7, plus how to identify infertile or bad eggs.
Candling chicken eggs is one of the coolest parts of hatching your own chicks. With nothing more than a bright light and a dark room, you can peek inside the egg and watch tiny life taking shape. It’s part science experiment, part miracle, and part “Whoa… did that eyeball just swim past?!”
This guide walks you through how to candle eggs, what you should see during the first week, especially on days 5 and 7, and how to spot non-viable eggs before they cause problems in the incubator. You’ll find real examples, clear explanations, tips for getting the best view, and advice for improving your chances of a successful hatch.
What Is Egg Candling?
Egg candling is the process of shining a bright light source into an egg to illuminate what’s happening inside. It lets you observe blood vessels, track chick development, and confirm whether an egg is fertile.
Initially, people used candles for this, thus the name. Thankfully, we’ve moved on to LED flashlights instead of open flames near feathers. Progress!
Candling helps you:
- Determine fertility.
- Check embryo growth.
- Identify non-viable eggs early.
- Prevent bad eggs from contaminating others.
- Improve hatch rates.
Every peek into the eggshell tells you something about the developing life hidden inside.
When Should You Candle Chicken Eggs?
Timing matters. Candling too early can be confusing, and candling too often can cool the eggs.
Here’s the sweet spot:
- Day 5–7: First candling to confirm fertility and early development. Pick one or two days during this period.
- Day 10: Check for progress; remove quitters.
- Day 14: Final check before lockdown.
- After Day 18: Stop. This is lockdown; no more candling.
A full incubation period for chicken eggs is about 21 days. That means what you see in the first week can tell you a LOT about how things are progressing.
For more hatching help and guidance on managing humidity and temperature throughout the process: Incubating Eggs: How to Hatch Chicken Eggs Using an Incubator.
If you’re working with a broody hen rather than an incubator, this guide walks through natural hatching step-by-step: How to Hatch Eggs With a Broody Hen.
What You Need to Candle Eggs
You don’t need fancy equipment, but lighting matters.
Best Tools for Candling:
- Egg candler: Designed specifically for candling; it is bright, steady, and gives the best view.
- Ultra-bright LED flashlight: Works great, especially if it forms a good seal against the egg.
- Regular flashlight: Works in a pinch, but usually not as bright.
- DIY candler: A box with a small hole and a strong light. Build your own with the instructions here.
LED lights are ideal because they’re bright yet stay cool, preventing overheating of the embryo during brief candling sessions.
Tips for Success
- Candle in a very dark room.
- Hold the egg gently with the large end up.
- Press the light to the small end to create that good seal.
- Work quickly to avoid cooling the eggs.
- Avoid handling eggs if humidity levels in the incubator fluctuate easily.
The darker the room and the brighter the light, the clearer your view of what’s happening inside that little oval universe.
Dark brown eggs (like Marans, Welsummers, and some hybrids) are harder to candle because the pigment blocks light. You’ll still see veining and movement, but you may need a stronger light source for the best view.
How to Candle Chicken Eggs (Step-by-Step)
It makes it much easier to see inside if you candle the eggs at night and turn off all the room lights so it is very dark.
I make my hand into a loose fist, like I’m holding onto a mixing spoon with it. On the top of my hand, I carefully place the egg, and then point the lighted flashlight upright into the bottom of my palm. The light shines up through my loose fist and shines through the egg so I can see everything inside.
Here are the steps:
- Wash and dry your hands.
- Turn off the lights or work at night.
- Hold the egg upright with the large end up, and the small end down.
- Press your light firmly against the small end to form a good seal.
- Slowly rotate the egg and observe the blood vessels, embryo shadow, and air cell.
- Return the egg to the incubator promptly to maintain humidity levels and temperature.
Don’t worry, you won’t hurt the embryo as long as you handle the egg gently and return it to the incubator promptly.
By the way, the first time you see a teeny embryo swimming around inside their shell and a tiny eyeball drift across the light? Prepare to experience a full-body shiver of amazement. Yes, it’s that amazing EVERY TIME.
What You Should See When Candling Eggs
Candling is like reading ultrasounds for chickens. You’re looking for patterns that signal normal chick development.
Signs of a Fertile, Developing Egg
- Strong, branching blood vessels.
- A dark spot or shadow. This is the embryo.
- A visible air cell at the large end.
- Increasing movement as days progress.
Signs of a Non-Viable Egg
- Completely clear interior.
- No visible veins.
- A blood ring.
- Cloudy or darkened interior.
- Yolk floating freely inside the egg.
- Any strange smell (trust your nose!).
Removing non-viable eggs early protects developing chicks and ensures a successful hatch. Rotten eggs can explode, and yes… it’s as awful as it sounds.
Candling Chicken Eggs on Day 5
Welcome to the first week of chick development! On day 5, amazing things are happening inside that shell. This is usually your first real chance to see whether an egg is fertile. By day 5, the embryo’s major organs are forming, and the circulatory system is in full swing.
Here’s what you should see:
- A spiderweb of blood vessels radiating from a central point.
- A tiny embryo shadow, often near the top.
- A clearly defined air cell.
- Occasional subtle movement.
You might also spot that iconic dark embryo eye, which looks huge compared to the rest of the developing chick at this stage.
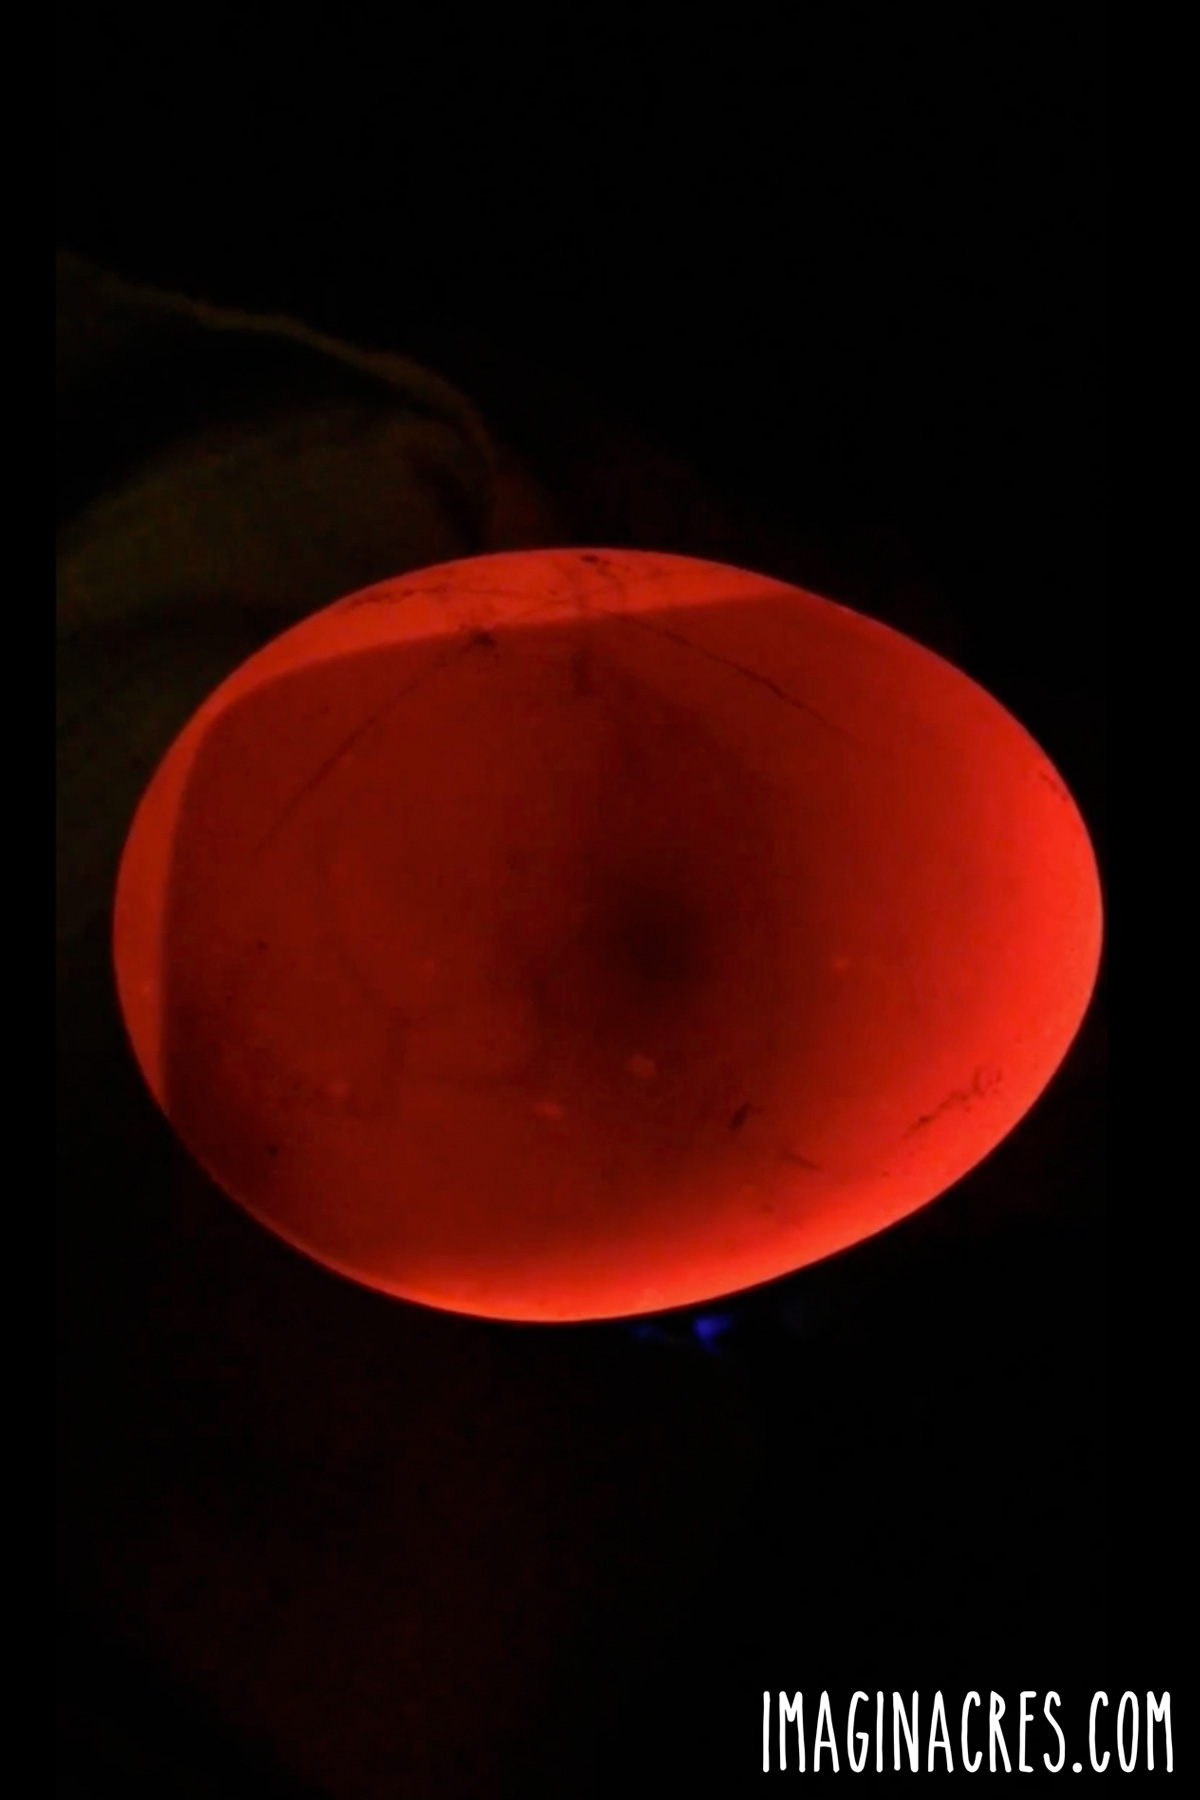
Here are some photos from candling eggs on Day 5:
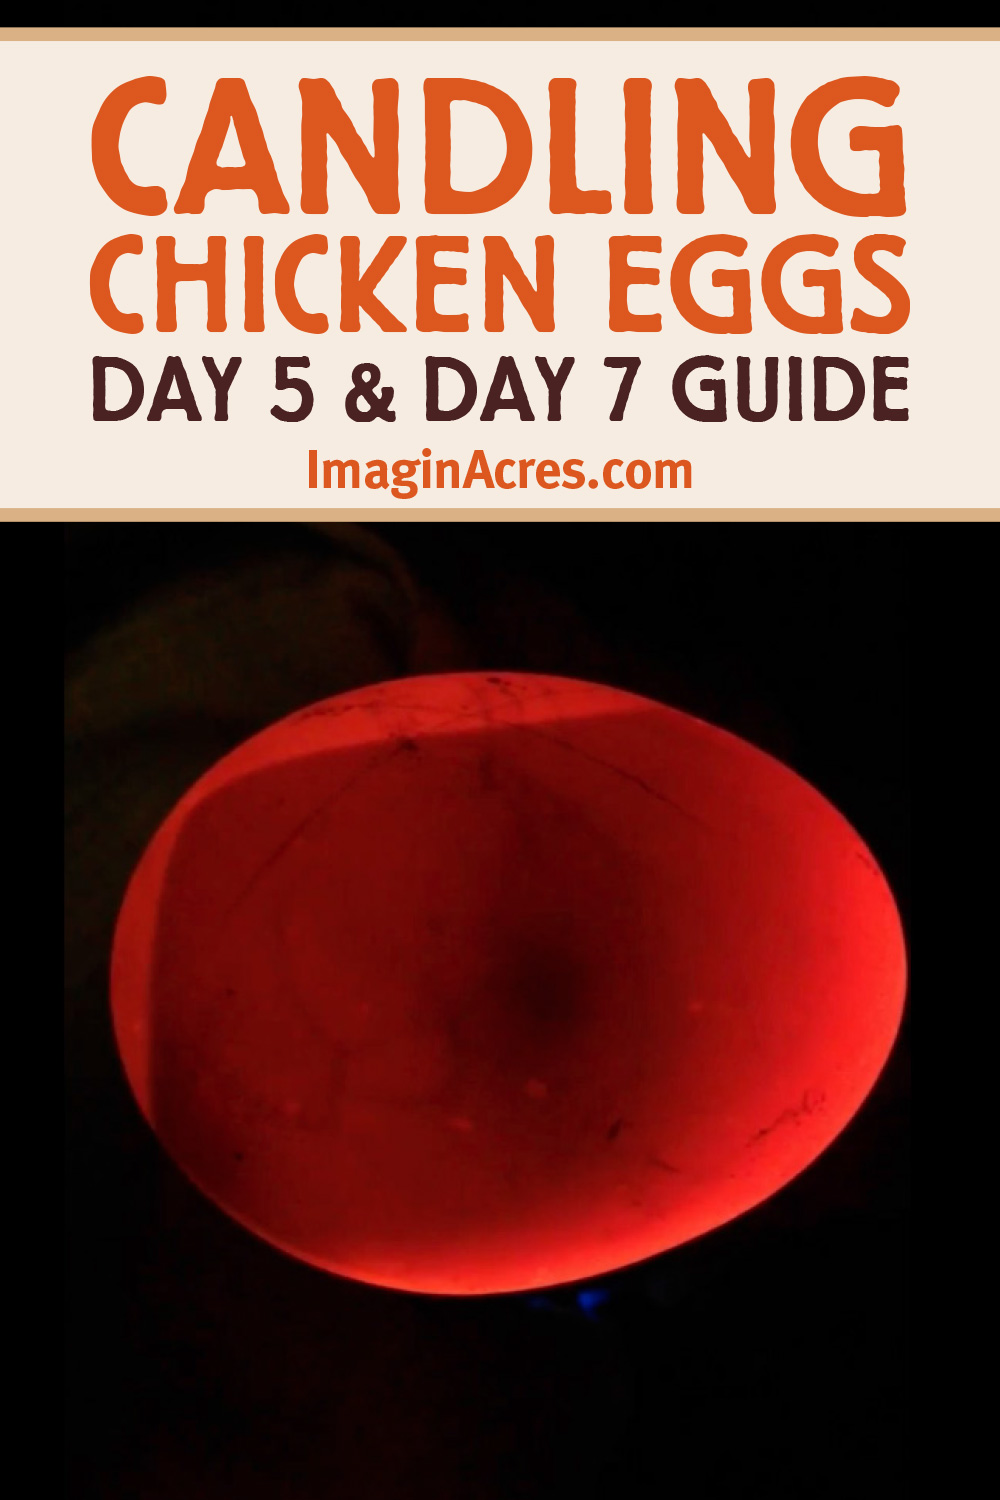
You can see a lot of veining in this photo, and the air sac is clearly defined at the large end of the egg. The embryo is contained in that dark shadow at the top. Way to go, little embryos!
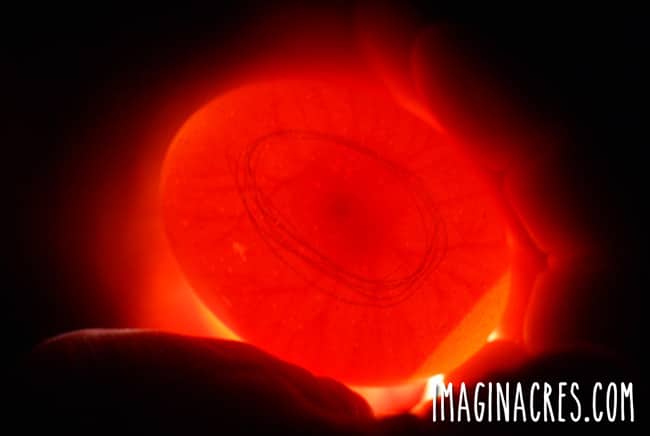
That super dark spot next to the pencil lines is the chick’s eye. At this point in development, the eye takes up a huge portion of the embryo’s head and is easy to see through the egg.

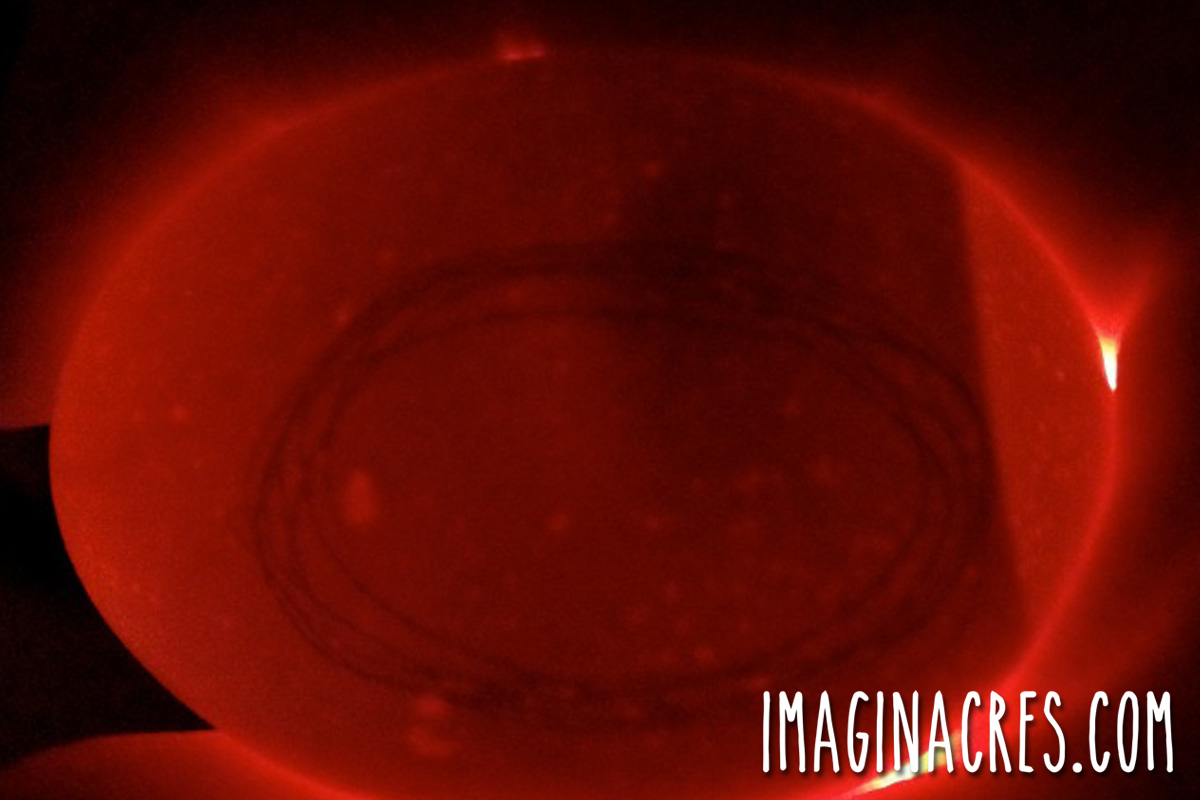
The photo above was also taken on day 5. The embryo is in the very center of the “O” with the veins spidering out from it. We could see a little movement in there, but nothing compared to the videos on day 7 below!
Unfertilized or Non-Developing Day 5 Eggs
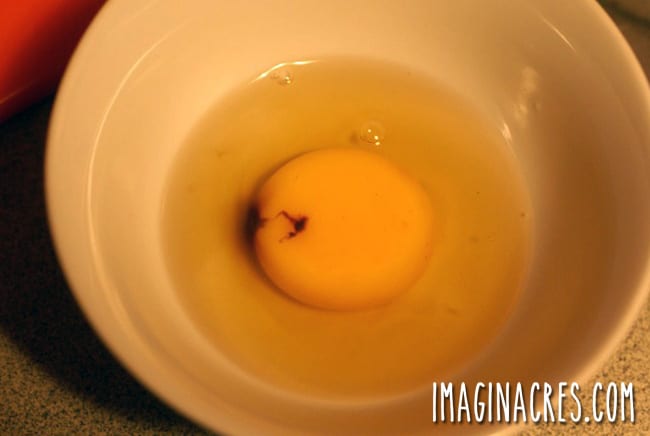
Just for reference, here’s a photo of an unfertilized or undeveloped egg. On day 5, you should see veining and maybe the shadow of the embryo, but this egg was a dud.
What Unfertilized or Non-Developing Day 5 Eggs Look Like
- Clear, with no veining.
- Yolk drifting freely when the egg turns.
- No visible shadow of an embryo.
If an egg looks the same as it did before incubation, it’s probably infertile.

When we candled, I could see that dark spot on the egg through the shell. I thought it was a developing chick, but no, a rotting egg. I suspected that the egg had a detached yolk, as it was freely floating all around the egg when I turned it.
Curiosity got the better of me. Since I knew it wasn’t fertilized, I broke it open in a bowl before throwing it away. Very good thing I got that thing out of the incubator before it started to stink!
If the contents slosh around when you tilt the egg, or you see a dark mass without veining, it’s time to remove it. Better out now than becoming a sulfur bomb later.
Candling Chicken Eggs on Day 7
By day 7, the chick is developing rapidly, and you should see much more activity. The embryo’s organs have all formed, and a teeny little beak is beginning to take shape. The heart, which formed outside the body, moves inside the body on this day.
What a Healthy Day 7 Eggs Look Like
- Strong, prominent blood vessels.
- A noticeably larger embryo.
- Clear, easy-to-spot movement.
- A darkened mass near the top or center of the egg.
- The dramatic sweep of a giant embryo eye.
It’s at this point that many candlers become obsessed. The embryo wiggles, flicks its tiny spine, and shifts around like it’s practicing dance moves. If you’re lucky, you’ll catch it doing a full somersault.
Here’s a video of egg #1, which has consistently been the most active embryo in the bunch. It looks like it’s dancing every time I shine a light on it.
You can very clearly see the veins in this one, and at the very beginning, you can see the embryo’s eyeball, appearing as a dark spot, swimming across the surface of the egg. Creepy, yes?
Here’s the second video of embryo movement, a little harder to see but fascinating nonetheless!
If an Egg Still Looks Completely Clear
Remove it. By day 7, a fertile egg will show veins. Clear eggs are infertile or quit early.
Common Reasons Eggs Stop Developing
Even with perfect care, not every egg will make it through the incubation period. Common causes include:
- Infertility
- Temperature fluctuations
- Incorrect humidity levels
- Rough handling
- Bacterial contamination
- Improper turning
- Detached yolks
- Genetics
It’s normal to lose a few. Even experienced hatchers rarely get 100%.
If you’re seeing blood rings or other signs of failed development, read my full Troubleshooting: Why Aren’t Eggs Hatching? guide to understand possible causes and what to adjust next time.
When to Remove Eggs From the Incubator
Take out eggs that show:
- No veining by day 7
- Blood rings
- Cloudy or dark, suspicious interiors
- Leaking or cracked shells
- Any sign of rot
Removing them helps protect the healthy embryos and keeps you from learning what fermented egg soup smells like.
What Happens Next?
After day 10 and day 14, development becomes even more pronounced. Movement gets stronger, shadows get darker, and the chick takes up most of the egg.
Once you reach day 18, stop turning the eggs and leave them alone during lockdown. Keep humidity levels stable, be patient, and prepare for the excitement of hatch day.
For the next steps in your chick-raising adventure:
- Incubating Eggs: How to Hatch Chicken Eggs Using an Incubator
- How to Hatch Eggs with a Broody Hen
- Introducing Chicks to a Broody Hen
- How to Raise Chicks in a Brooder: The First 6 Weeks
Hatching is a wild ride, equal parts science experiment and emotional roller coaster, but one of the most rewarding things you can do on a backyard homestead.
A Peek Behind the Eggshell Curtain
Candling chicken eggs is one of the most magical moments of the entire hatching journey. Watching those delicate blood vessels, tiny eyeballs, and wiggly embryo movements makes you feel like you have superpowers. And honestly? You kind of do.
With the right light source, good technique, and a bit of practice, you’ll gain tons of confidence in recognizing healthy development and identifying non-viable eggs early. Every little window into that shell brings you one step closer to a successful hatch.
Preparing for hatch day? Here’s where to go next: Incubating Eggs: How to Hatch Chicken Eggs Using an Incubator.
And trust me: the excitement never wears off.


How fun is that? I can’t wait to see the updates. And this would be an awesome science activity for school kids!
Yes indeed! I remember hatching chicks in my first grade class, it was super fun. We’re giving 6 of these chicks to our friends who have two little girls, they’ll be coming over to see the candling soon!
Wow, so crazy to see it moving inside the egg! Your photos and videos are awesome. I’ve never seen eggs in this way before. So cool! Best of luck with the rest of the hatching 🙂
Thanks Tammy! I still get all giddy every time I see them move inside the egg, it’s so bizarre. I’ll be sure to post more pics as things move along!
Saw your comment about my ceramic egg crates and thought I’d reply here just to make sure you see it! I got those over 3 years ago from Anthropologie online. I don’t think they carry them anymore, but I have seen similar ones at Target lately. Also online at Sur La Table
Hope that helps! 🙂
Yay! Thank you so much Tammy! I’m going to check those out. I want to figure out how to make my own… maybe I’ll do a press mold, hmmm! Thanks again!!
Thanks so much for sharing!! My girls are saving up to buy an incubator and they thought this was sooooo cool! So did I 🙂 Can’t wait to see more.
That’s so exciting! Your kids are going to LOVE incubating eggs, it’s one of the coolest things I’ve ever seen!