10 Tips for Photographing Chickens
Chickens can provide a range of interesting photographs. If you are new to photographing animals, here are some helpful tips for photographing chickens on the move.
Taking great photos is an art, but it’s also a practice. If you’ve been admiring the photos here and wondering to yourself: why can’t I take photos like that? Well, wonder no more!

I’m going to tell you exactly how I capture the personality and beauty of our feathered friends. In this article I’ll reveal my secrets and tell you my top ten tips for photographing chickens. These tips can be used for photographing any animal, the same rules apply, I’ve just used chickens here as my examples because, well, that’s what I do!
So, without further ado, away we go!
Tip 1: Get a Great Camera
Using a Digital SLR camera with appropriate lenses is essential to taking incredible photographs. I hear so many people say that the camera doesn’t matter. It absolutely does. If the camera didn’t matter, professional photographers would use point and shoot cameras for all of their work.
I understand and agree that you can get good shots with a point and shoot, or even with an iPhone, but to get truly phenomenal photographs, you need to invest in a decent camera. I use the Nikon 1576 D5600 DX-Format Digital SLR and it’s a wonderful camera. Most of my photos are taken with a micro lens, which creates super crisp close-ups.
This is not to say that you shouldn’t bother taking photos of your chickens if you don’t have a nice camera. You’ll have a lot of time while you’re saving up for your amazing camera. Use that time wisely to practice all of the points below, and then when you have your fancy camera, it will already be second nature.
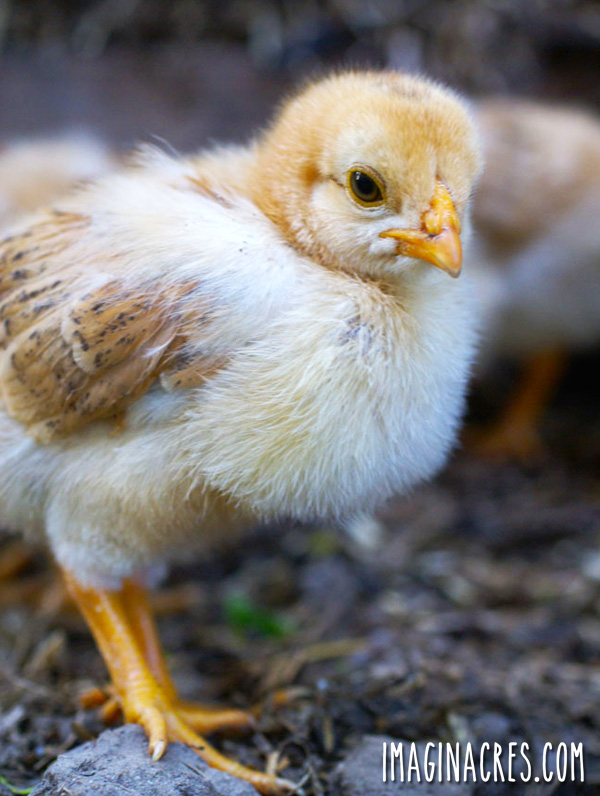
To prove this point, let me show you some photos of our hen Dee Dee.
This photo was taken with my camera, you can see that the subject is in crisp focus, the busy background is blurred, and the exposure and saturation were perfect without any editing.
In comparison, this photo was taken with my phone. The background is busy and since it’s in focus, it’s distracting from the subject. The photo is also more grainy and the colors are a bit off.

Tip 2: Be Patient when Photographing Chickens
It’s easy to get frustrated when your subject is constantly moving. If you want to take great photos of chickens, or really any animals, you’ll need a lot of patience. Some days I’m sitting in the backyard for hours with my lens pointed at whichever chicken is closest to me. Taking great photos of animals means plenty of waiting around for the perfect shot to present itself.

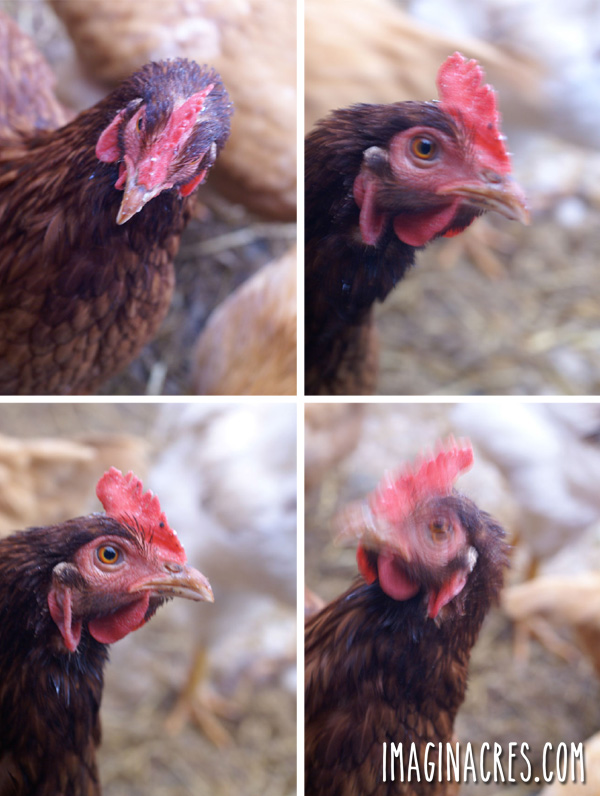
Tip 3: Take Photos in Batches
This tip goes hand in hand with the one above. If you’re patient and keep snapping away, you’re bound to get at least one get shot.
For every amazing photo I have of our chickens, I have ten bad ones.
I’ll take five photos in a row of exactly the same thing, hoping that one of them will show the chicken in a great pose in perfect focus. This is another reason why it’s great to have a DSLR camera. You can take photos in batches, one right after another, without the camera having to pause, and if they turn out bad, no harm done!
To make this point, I’m going to show you a series of photos taken of Henrietta. As you can see, one of these photos is amazing and the rest are crap. This is animal photography. You can’t tell the animal to sit still and can’t force it into a perfect pose, so you have to take lots of pictures to make up for that and one of them is bound to be great. Just to clarify, she’s not diseased, the stuff all over her face is ricotta cheese from her afternoon snack.

Tip 4: Get the Photo’s Lighting Right
Lighting is the single most important aspect of photography. You can have the perfect subject, the most amazing camera, and the best skills, but if your lighting is terrible, your shot will be as well.
When Little Carl hatched out a brood of chicks last spring, I was anxious to get some mother and baby shots as soon as the first one hatched. Little Carl was brooding in a nesting box in the coop, where it was mighty dark. Taking photos proved to be extremely difficult. Let me show you.
- Too Dark and Grainy: The photo below on the top left was taken with the camera on aperture priority, which I leave it on by default. It’s dark and grainy and you can hardly tell this is a photo of chickens.
- Low Blurry and Grainy: For the photo on the top right, I changed the shutter speed to help a bit with the lighting, but not enough. A constantly moving chick plus low lighting equals blurry images.
- Too Harsh with the Flash: Next I tried putting on the flash, which I practically never use, but was willing to try anything to get my shot. The resulting photo is washed out, the colors are all wrong, and it just plain looks like something out of a nightmare. By the way, this was taken with the built in flash. If I had attached a higher quality flash, the photo would have been much better.

Finally, I decided I would just move my subject to where there was enough light for the photograph. I couldn’t move Little Carl because she was still sitting on some eggs, but I did pick up the little pipsqueak and moved her to the window.
Finally, something decent!
Natural light is always your best friend when photographing anything, but especially animals. When your subject is constantly moving, you need as much light as possible to help you get a clear shot. If you consistently need to take photos indoors with bad lighting, do your research and invest in a camera and flash that will help you in those conditions.
Tip 5: Crop the Photos
I can’t emphasize enough how important it is to crop photos. When you’re taking pictures of a fast moving subject in a messy backyard, you will occasionally get some unsightly background bits. Sometimes all it takes is using the crop tool to cut out background garbage.
Take this image below of Frank, for instance. He’s looking handsome as ever, but everything surrounding him is very distracting. There are lines going every which way, taking your eye away from the beautiful subject. Frank is sad that you’re not noticing him. Hurry! Crop that photo!

Ah, much better. My eyes are no longer going every which way trying to figure out that background, they’re looking at Frank, and he’s oh, so happy.

Another good reason to crop is that you want your subject to fill the frame as much as possible. A photo of a chick with several inches of nothing around them is not as interesting as one that’s up close and personal. One exception, if you have a beautiful backdrop and you want to show off the scenery. We live in the city, so there’s not much scenery to be spoken for here.
The adorable baby chick in the photo to the left is getting lost in a sea of straw. Since the subject, background, and foreground are so similar in color, they all blend together in the photo. Cropping the subject really close lets her really stand out and shine in the right photos. See? Beautiful!

Tip 6: Photograph Up Close or Get a Zoom Lens
I see so many photos of chickens looking like this:

Sure, those fluffy butts are real cute and all but is this really the best way to show off your hens?
Getting up close and personal with those chickens can instantly take a photo from: “Oh, that’s nice,” to “WOWZERS look at that hen!” If your hens are skittish and won’t let you anywhere near them, invest in a zoom lens so you can get up close pictures from afar. Don’t be afraid to grab the chicken and hold her with one arm while photographing her with the other. Or, if you’re lucky enough to have a chicken wrangler, force them to hold the struggling chicken while you snap away.
See how much texture and detail you can capture when you take up close photos? I captured this photo of Taco while holding her. Her feisty attitude made it tough, but worth it. You can read all about Taco’s personality in my post: Meet Taco The Diva.
Tip 7: Be Aware of Your Photo Angles
Most people take photos of animals from their super tall human level. This angle isn’t doing your photo any favors. There’s nothing interesting about the top of a chicken surrounded by grass. Let me demonstrate:

Instead, try getting right down on the ground with them. You can get great photos from this angle, and it’s the best way to get your pants all muddy! Same chicken, same camera, same day… way better photo

Sometimes it’s really tough to get photos from this low angle. Especially when photographing chickens because they move constantly. It’s a big pain to sit down and line up the perfect shot then your subject runs away and you have to go chasing after it.
The really nice thing about digital cameras is the big viewfinder on the back. This makes it possible for you to stand up with your camera held at their level and still see what you’re doing. If your camera doesn’t have a digital viewfinder, try holding the camera down anyway and snapping some blind photos. You’d be surprised at the interesting shots you can get when you’re not looking!
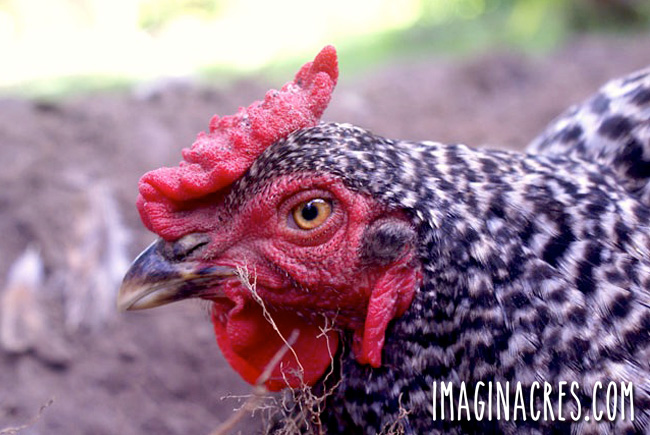
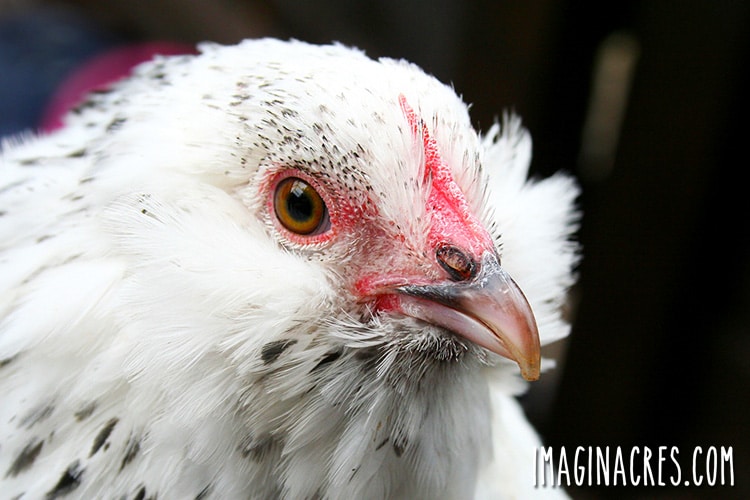
Tip 8: Focus on the Chicken’s Eyes
When I was ten years old I wanted to start an animal photography business. I loved taking photos of my pets and figured other people would love for me to take photos of their pets. Little did I know, child labor laws prohibit ten year olds from opening their own business.
Anyway, my lovely parents always encouraged my artistic endeavors and bought me several books on animal photography. The most important tip highlighted in each book was to always focus on the eyes. This tip has still stuck with me for the past two decades and I say it to myself every time I have a camera in hand. Focus on the eyes.
The most important point of your animal photograph is the eyes. If the eyes are closed, or blurry, the photo won’t be great. Let this be your mantra whenever you have your camera in hand. Focus on the eyes. Focus on the eyes. Focus on the eyes.
This tip applies to photographing people as well, and it can make or break a shot.
Take the photo on the left of Frenchie, where I hadn’t focused on her eyes. That one simple mistake ruins the whole photo.
The photo on the right with focus placed on the eyes results in a stellar shot!

Tip 9: Get Your Chicken in Focus Before Taking the Shot
Speaking of focus, you want to make sure your subject is already in focus before the perfect shot comes along. Say I’m taking a picture of a tiny little, very energetic, chick. I’m sitting on the ground with my camera on her, and she’s pecking away at the dirt and not doing anything particularly picture worthy. This is the time to get her all in focus.
I can keep watching her through the lens and when she pauses for a moment and looks up, I can snap the photo. It takes the camera about a second to focus on a subject, and animals hold one pose for about a second before moving on. You want to already have that focus ready so you can just shoot.
Tip 10: Be Aware of Your Background and Foreground
I see so many great photos completely ruined by terrible backgrounds. This is not to say that if you have a perfect shot and a bad background you shouldn’t take it, there’s always Photoshop for these scenarios. Sometimes just a simple tilt or shift on your part can completely obscure any bad background you have.
Another trick I use to deal with bad backgrounds is setting my camera on aperture priority or using a macro lens. This blurs the background behind the subject, so even if there is a big pile of garbage back there, you won’t see it.

Foregrounds can be just as much of an issue as backgrounds. Most photos that I see of chickens are actually photos of chicken wire with a chicken in the background like example 1 below.
I know that many people don’t have the luxury of letting their chickens roam and getting pictures of them outside of fencing. But let me show you two easy, quick fixes to the chicken wire problem.
- Set the Camera to Aperture Priority: This will blur everything behind your subject and in front of your subject. The chicken wire goes from obnoxious and in your face, to a hardly noticeable artistic haze around your subject as shown in example 2 below.
- Get as Close as Possible: You can also hold your camera right up against the chicken wire, with the middle most part of the lens between the wires. You may still get a bit of wire on the edges of your shot, but mostly chicken. Example 3 is a photo of Foghorn with the camera held a few inches away from the wire.
In example 4, I’ve pressed the lens right up against the wire. You’d barely know this picture was taken from behind chicken wire!

With that, I leave you to go explore your new photography skills.
I hope these tips will help you to capture the character and beauty of your chickens. I would love to see the photos you come up with after reading these tips. Please feel free to post them on our Facebook page for the world to see!
Capturing the perfect photo is rewarding!

Wow, what great tips! Thanks for sharing!
Thanks Betty!! 🙂
Great tips!! I couldn’t agree more. 🙂 I look forward to looking at Taco’s picture for a whole month in just a few more weeks!
Awww thanks Leigh!! I’m so excited about my photos getting into your calendar. I’m looking forward to March as well!
Great post Meredith. Love your tips, I think they’ll really help me out 🙂
Thanks Lesa, glad to share!
Wow. Such great information. I’m wanting to get a new camera for my picture taking. They’re pretty expensive aren’t they. I guess you get what you pay for. I’ll have to start shopping. You’re tips are exactly what I needed to read. Thank you so much for your expertise. I hope to be taking better photos soon.
Thank you Lyn! Yes, quality cameras are quite expensive, but you can get a decent one for under $300, or check out Ebay for a used one in good condition. I got my camera and lenses used from a pro photographer who was upgrading to a Nikon. I’ve had my Sony for almost 5 years now and it has served me well. I would love to see some of your photos when you take them, feel free to come back and share, or share on our Facebook page! http://www.facebook.com/imaginacres
Meredith this is really a great article. I found lots of interesting tips and plan to put them into practice the next time I head out with the camera! I have been told by other photographers to focus on the eyes, too. Best advice!
Ok, wow. I feel so dumb for not knowing these things. Haha! Chickens are such a pain to photograph! I am totally using these tips ASAP. Thank you so much for being so specific with your instructions! So many people claim to just “point and click” and miraculously end up with spectacular pictures. I’m not one of them. lol
Haha I can guarantee you that a lot more work goes into those photos than just pointing and clicking! I hope these tips help you!
You take beautiful photos! I need to take your advice and invest in a camera so I can capture my chickens like this well!
Thanks so much for these straight forward tips! Your photographic examples are great.
I DO have a nice DSLR but have been lazy about bringing it out to the chicken yard… but there is a distinct difference between the photos I have shot with my DSLR vs my phone.
It’s inspiring to hear that I should take the chickies seriously and shot them with the DSLR!
Also! About focusing on their eyes – just like people portraits 🙂
Thanks you for the tips!