10 Tips for Baking Bread at Home
Want to make your own bread? There’s just nothing like a warm slice of homemade bread fresh out of the oven. Once you start baking bread at home, you’ll never go back to store bought loaves.
In addition to the delicious flavor, homemade bread is also much less expensive per loaf than supermarket bread, and there are no additives or preservatives.

Baking bread at home is a learning experience. It takes time to understand how the ingredients work together and transform into a delicious loaf of bread.
After several attempts, you will gain knowledge of how the dough should feel throughout the bread making process. You will be able to tell when the dough has been kneaded long enough, easily identify when it needs a bit more flour or liquid, and know the optimal time to place the bread in the oven.
It’s ok to fail. Succeeding without failure teaches you very little. Your failures help you become a better bread baker. So don’t give up. Try again. Eventually, you will get it and be rewarded with a homemade loaf of bread that will taste better than the supermarket breads.
By the way, don’t toss your failed loaves in the trash. Turn those failures into homemade bread crumbs.
3 Ways to Knead Bread Dough
The process of kneading the bread dough mixes the ingredients and helps create the gluten structure that gives the bread texture and helps it rise. As the dough is kneaded, gluten strands form. Gluten makes the dough stretchy which allows it to expand as it rises.
There are several ways you can knead bread, by hand, bread machine, or stand mixer:
How Knead Dough Manually
Kneading bread by hand seems like it is so labor intensive.
Sure, your hands may hurt, and you’ll get bored, and you’ll look for distractions, but just keep kneading. It’s going to be worth it. Besides, you’re getting a great arm workout, and this is the perfect time to do some of that meditation you’ve been meaning to work into your busy life. Plus you will learn how the bread dough feels throughout the kneading process.

It really isn’t that hard. You just have to give it the time it deserves. Think back to our ancestors’ time when every household made bread each day to feed their families.
Once the dough ingredients are roughly combined in a large bowl, it’s time to knead it by hand:
Step 1: Lightly flour a clean flat surface and dump out the dough into a rough pile.
Step 2: Generously flour your hands and gather the bread dough together in a ball.
Step 3: Gently push the dough down and away from you with the heals of your hands.
Step 4: Fold the dough in half, give it a quarter turn, and push the dough down and away from you again.
Step 5: Dust with flour as needed to prevent sticking and repeat the kneading process until the dough is smooth on the outside, no longer sticky, and springs back when pressed with your fingers, about 5-10 minutes. Once your bread dough is kneaded sufficiently, it is ready for its first rise. Follow your recipe for the next steps.
How to Knead Dough with a Bread Machine
A bread machine makes it easy to make bread because it does most of the labor for you. There is also less of a mess to clean up because the ingredients are contained in the bread machine’s pan.
I prefer baking my bread in the oven, but you can bake a loaf right in the machine if you want. Simple follow the recipes that come with the bread maker.
Instead of kneading by hand, I do use the bread machine’s dough cycle to mix the ingredients and provide the perfect temperature for the bread dough’s first rise, and then I form my loaves in a regular bread pan, let it rise, and bake.
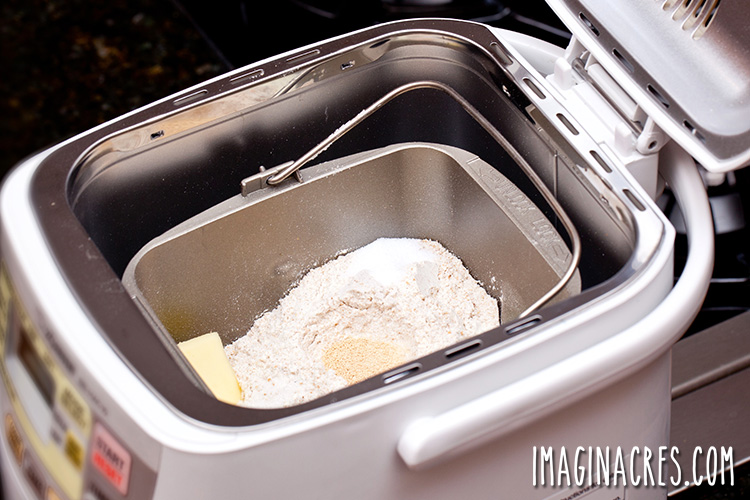
Step 1: Add the ingredients in the order your bread machine suggests. Each brand is different. Some suggest adding the liquids first, the dry ingredients, and the active dry yeast on top. Others have you proof the yeast in warm water before adding to the machine’s bread pan. You can use any recipe, but follow your bread machine’s instructions for the order of adding the ingredients to the bread pan for the best results.
Step 2: Select the bread machine’s manual or dough setting. Once the bread dough ingredients are in the machine, select the manual or dough setting. The machine will proceed to combine the ingredients, knead the dough, and give the dough the first rise.
While the machine is mixing, feel free to take a peek inside to observe how the dough is coming together. It will be shaggy at first, and then it will smooth out and eventually form a ball. Your machine may pause several times during the mixing process. This is to let the dough rest, which allows the gluten to develop. Once the bread machine hits the rising cycle, keep the cover closed to retain the heat.
Step 3: Wait for the beep. Your machine will beep to let you know it is finished the dough cycle. Follow your recipe for the next steps.
Kneading the Dough using a Stand Mixer
A sturdy stand mixer with a dough hook can mix and knead the dough easily. The mixer will combine the ingredients, and knead the dough by turning and folding it in the mixing bowl.

Step 1: Add the liquids and yeast to the mixer bowl. Add warm liquids and yeast to a large mixing bowl. Let it fizz for a bit, and then add the remaining ingredients except the flour. Turn the mixer on low to combine the ingredients.
Step 2: Add the bread flour. Add the flour a little at a time and let the mixer blend it in each time. The dough will start to pull away from the sides of the bowl and build up on the dough hook. When this happens, it’s time to begin kneading.
Step 3: Kneading the dough. Stop the mixer and scrape the sides of the bowl with a rubber spatula. Turn on the mixer and knead on low speed for 5-7 minutes, or until the dough is smooth and elastic. Once your dough is kneaded, check the recipe for the next steps.
10 Tips for Making Homemade Bread
Learning how to bake bread takes time and perseverance. I spent close to two years learning how to bake bread. In those two years, I’ve made every mistake in the book.
I was so determined to figure out this bread-baking thing, that I baked six loaves in one day. I messed up different things every time.
I felt defeated…but I didn’t give up.
I took all that I’d learned from those failed loaves, and baked a perfect loaf of bread the very next day. With every loaf after that, I’ve been having more and more success.
I’m here to tell you it is possible for everyone to bake bread, and I’m going to make it much easier on you by telling you everything I’ve done wrong and share some bread baking tips I’ve learned along the way:
1. Follow the bread recipe instructions
This may seem obvious to some of you. Some of you would never dream of straying away from a recipe. If that’s you, feel free to skip to the next tip. The rest of you are more like me. Hard headed, stubborn souls. Unless you are a master baker (which you’re probably not, because you wouldn’t be reading this if you were) you must follow the recipe exactly as it is written.
Gather the ingredients ahead of time and add them together in the order given in the recipe.
2. Use bread flour
Unless stated otherwise, always use bread flour to make bread. Bread flour is not the same as all-purpose flour. It contains considerably more protein, which will aid in gluten development, making your bread rise better, have an amazing texture, and taste wonderful.
You don’t have to go to a fancy pants bakery supply store to get bread flour. Simply buy King Arthur Unbleached Bread Flour at your local grocery store or order online. If you want to be a fancy pants and shop at the bakery supply- go for it! I won’t judge you. Or your pants. Well, maybe the pants. It depends on how fancy they are.
3. Use fresh yeast
Yeast plays many roles in developing bread dough into a fluffy loaf. Yeast is living organisms that convert sugars into carbon dioxide, ethanol, flavor molecules, and energy. Carbon dioxide is formed as the dough rises. Ethanol is formed and reacts to the heat in the oven to gas creating the bubbles in the bread. Yeast also aids in the development and strength of the gluten in the dough.
Dried yeast is probably the most confusing part of making bread because there are a number of choices in the supermarket baking section.
- Active Dry Yeast is a granular yeast that remains dormant until it is activated by dissolving it in warm water before using.
- Instant Yeast is similar to active dry yeast, but it is made up of smaller particles that dissolve quickly. Instant yeast doesn’t have to be activated in warm water before adding to your recipe. Instead, it can be mixed into the dry ingredients with the same result. Instant yeast is also called rapid-rise yeast, quick-rise yeast, bread machine yeast, and SAF instant yeast.
Both active dry yeast and instant yeast come in 3-packs and jars. If you bake bread a lot, consider purchasing a one-pound block of SAF instant yeast, dividing it into air-tight jars, and storing it in your freezer.
Are you wondering if you yeast is still good? Test it first by dissolving one teaspoon of sugar in 1/2 cup warm water (105-115˚F). Stir in a yeast packet or 2 1/4 teaspoons of dry yeast until it is dissolved. The yeast should begin to activate right away, and after 10 minutes should rise to the top.
If the yeast is good, you can use it in your recipe right away (remembering to deduct 1/2 cup liquid from your recipe). If the yeast failed to bubble and rise then it has gone bad and should be tossed away.
4. Use warm water, not too cold and not too hot
You know how the recipe says to pour the yeast into warm water? Yeah, it actually needs to be warm. Not hot. Water that is too hot will kill your yeast. Think the same temperature you would make a baby’s bath water. We’re talking lukewarm here. Test it on your wrist or your face if you have to, hands are not dependable temperature gauges. Or use an instant read thermometer to check the water temperature. Ideal temperature is between 105-115˚F.
The vast majority of my failed loaves were caused by this simple mistake. I would use water that was way too warm and kill most of my yeast. When I would go to check on my rising dough, it would be sitting in the bowl looking up at me in exactly the same dense, sticky way it did when I left it.
5. Measure the bread ingredients using a scale
Whenever possible, use a scale to weigh your flour instead of measuring cups. Flour is a very tricky thing. It’s very easy to end up with too much or too little flour when using cups because flour condenses when you handle it.
If your bread recipe has the amount of flour needed in pounds or ounces, grab a kitchen scale and use it. If you are using King Arthur flour, they have a handy weight chart on their website. Each brand of flour is different. Check the website of you brand.
6. Be sure to knead the bread dough long enough
This is one of the most crucial steps, and if you mess it up, your bread won’t rise correctly and won’t have the proper texture. Set a timer if you have to, and when in doubt, keep kneading. If you don’t know if the dough is springy, elastic, or smooth yet, then it isn’t.
See the tips at the top for three ways to knead bread by hand, bread machine, or stand mixer.
7. Cover your bread dough and let it rise
For the first rise, coat a large bowl with oil or butter, place the dough into the bowl, and flip it over so the top and bottom are greased. Cover the bowl with a clean tea towel, and let the dough rise until it has doubled in size.

After you have formed your loaf, cover the pan with a towel and let it rise again until double. The dough will rise quicker in warm weather and slower when it is cool.
8. Proof your dough in the perfect place
Place your dough to rise in a warm place, not hot. Make sure it’s not a drafty place, or a place where your curious cat can stick his face in it.
For months during my bread baking failures, I would try to get my bread to rise in a warm oven. I would turn it on to 200˚F then shut it off and put the dough inside. It didn’t rise. It just sat there because I killed the yeast by making the environment too warm.
How to proof bread in your oven the right way: Instead of turning on the oven, use it as a proof box to hold the heat and keep your bread dough away from drafts. This method creates a warm and humid environment perfect for yeast-leavened bread.
Bring a teakettle of water to boil. Place a large baking pan on the lower shelf in the cold oven. Add 3-4 cups of boiling water into the pan. Place the container of bread dough on the rack above, close the door, and let the dough to rise until doubled in bulk.
Dough does rise in cool conditions. It just takes longer. So don’t worry too much and let it be.
9. Don’t let the dough rise too long
You need your dough to rise just the perfect amount. This can be tricky but with practice, you’ll get it right. Dough does a final rise in the oven called “oven spring” and if you let it rise too long before it hits the oven, it will collapse and cause your bread to be dense and hard.
To check if you dough has risen enough, use your finger to lightly press into the dough on the side of your loaf. Watch how the dough responds:
- Dough is ready to bake if the indentation fills in about half way and holds its form.
- Dough needs to rise a little longer if it bounces back quickly and refills the dent completely.
- Dough has over-proofed if the depression doesn’t refill at all. Go ahead and bake it anyway. The top might collapse in the oven, and the loaf might be a bit dense, but it will still taste good.
10. Don’t trust the oven temperature
The actual temperature inside the oven can differ wildly from the temperature you set it to. Get a decent oven thermometer and always follow it.
Along the same lines, be sure to place your bread pans in the center of the oven, where the heat tends to be most consistent. Placing them along the edges, or too close to the bottom or top can lead to uneven baking.
Another thing to remember is every oven is different. Yours might bake the bread quickly while your friend’s oven may take longer. For this reason, you can’t exactly trust the baking time on recipes. Keep close track while baking and check the bread frequently toward the end. You will know it’s done when you flip it out of the pan, tap on the bottom and hear a hollow sound. Any other sounds and it needs a little more time.
Bread Recipes to Try:
Here are some bread recipes to get you started:
- Country White Bread – ImaginAcres
- Potato Bread Recipe -The Pioneer Woman
- Classic Whole Wheat Bread – King Arthur Flour
- Roasted Garlic Rosemary Bread – Grow a Good Life
—–
The more you read, the better you’ll get at baking bread. If you’ve tried and failed with baking bread, you need this book. Bread Baking for Beginners totally saved me when I was on the verge of giving up trying to bake bread. This foolproof book is chock full of bread baking tips, and over thirty easy recipes for different breads.
The bread recipes from this book come out perfect every time. If you’re still struggling with baking bread, I can’t recommend this book highly enough!
I hope these bread baking tips help encourage you to keep trying. Do you make bread regularly? What tips can you add?
This article was originally published on 3/11/2013 it has been updated with more information and new photos.
Related Posts


Hee hee I had many a failed loaf too over a year or so as I taught myself the fine art of bread baking. I have no chickens though, so we have enough croutons, stuffing mix and bread crumbs to last us from now to eternity. I totally agree about the plastic instead of the towel to cover your dough. And while I would never try to keep you from a moment with your glorious bathroom gnome (seriously, both gnomes are adorable) what I’ve found for perfect proofing is inside the oven with the oven off (never on, no preheating) but the light on. If you have gas and it has a pilot light, that will be a good temp too. Mine’s electric though, so I just turn the light on and my dough rises perfectly. But I don’t have a bathroom gnome. I also use the oven-off-light-on trick to culture homemade yogurt overnight. However, I am a bit flighty and have had to get in the habit of pulling the knob off the oven while I’m using it as a proof box/incubator or else I’ll start to preheat it for something else and ruin whatever was growing.
That’s all great advice! Finding a good place to proof was one of my biggest struggles. Oh and about accidentally starting the oven with something fermenting inside of it- YES. We’ve done that so many times. I had no idea how bad a sourdough starter could smell until I made that horrid mistake!!
This post confuses me in only the part about using plastic wrap vs towel? Which is better?
Trish, Either plastic wrap or towel is ok. I am trying to use less plastic in the kitchen, so prefer to use a towel.
So I accidentally leaned on my dough as I was putting it in the oven and it started deflating. It cooked up nice. Is it ok?
Sarah, Yes, even if it may look a bit funny, it is ok.
I’m so impressed with your persistence!! Great job and a sign of a true baker! I would have given up long ago. Great tips and insight into the world of bread baking. I baked my first loaf over 20 years ago and was so amazed when they would come out well. I did this all by hand too. I love bread baking and even though I rely on my breadmaker now, homemade bread is definitely worth all the time and effort. Thanks for your post!
Thanks Nancy! 🙂
I worked for a bakery for 4 years. I was lucky enough to learn all their secrets. One is to use a proof box. That’s how they get their bread to rise every time no matter the drafts or the weather.
While your bread is kneading.( I use my kitchen aid and knead for 8 to 10 minutes.) Put a pan of water on the stove to boil. After it starts boiling, pour it into a baking pan. Place your bread in a cold oven add the boiling water and shut door. Do not open door till after the hour is up. You have just made your own proof box. Do the same for the second rise. Make sure to check it after 20 to 30 minutes. It may rise faster on the second rise. Leave the water in the oven while cooking the bread . This will make the bread softer. Start cooking with a cold oven.) you will have to add 6 minutes to 10 minutes to your time. But they come out perfect.
Wow, thanks for all that advice, Michelle! I’m definitely going to try that next time. I would be so happy if I could work in a bakery, it’s one of my lifelong dreams to learn from the masters! Thanks for stopping by!
My husband uses the artisan bread recipe and it’s delicious, we make the basic recipe but keep it in a tub and pull out what we need for that day- so easy and quick!
I’m so glad that artisan bread in minutes was invented! We love it too!
Hahahaha I totally ate some of my failed loaves too, and my wonderful fiance was nice enough to eat several slices of them, pretending to enjoy them just so my feelings wouldn’t get hurt. I have the artisan bread in 5 mins a day book but haven’t tried it yet. I’m going to give it a shot this week. Thanks for stopping by, Cat!
we mainly use the olive oil dough from the artisan bread in 5 min and make bread from it (i think it is supposed to be a pizza dough, but it is delish =)) the system in this book is really nice. it takes barely any time and you just take the dough out of the fridge when you need it. very practical. give it a try, its worth it =)
I’m definitely going to try that this weekend, thanks Cat!
Thank you so much for this post. So timely for me too, because I did give up about a year ago but recently decided to try again this winter. So when I saw the title, I was all over this! I will take each tip quite seriously this year. I have a question for you though. Years ago (like in the 70s) when I was taking Home Ec in high school, they made us “sift” our flour. I rarely see any mention of sifting in a recipe. Is this no longer necessary? Did someone prove it was pointless and so nobody does it anymore? Or is it ASSUMED that bakers know to sift? What is the scoop on sifting? Thanks! Jo
I’m so glad you’re giving it another shot Jo! I really feel like I’ve done everything wrong that a person can do wrong when it comes to baking bread, and if I finally succeeded, you can too! Honestly when it comes to sifting- I don’t do it unless a recipe tells me to- such as in cake or other pastry baking. I think it used to be more important to sift flour than it is now. From the many bread books I’ve read, I learned that it used to be processed differently and would often have lumps or other debris in it from the factory, and sifting would help even it out before use. These days flour is so heavily processed at the factory that it pretty much comes pre-sifted, and the only time you’d really need to sift it would be to incorporate air for light pastries. So in short, I would say it’s only necessary when the recipe specifically says to, otherwise you should be fine! 🙂
I am so glad to hear that! At least now I can rule that one out as being a reason for my failures. That said, I will hold on to the sifter anyway because once I master bread, I plan to move on to pastries & pies. Thanks again. When I finally succeed, I am SURE you will hear about it on Homestead Chronicles. Don’t doubt that! And I will thank you link back to here from my post.
Have a great day! — Jo
One of the first bread cookbooks we had said to turn on the oven for 1 minute at 400 degrees and then TURN IT BACK OFF. Place your bread dough in the oven to rise. The goal is to have the temperature like a very warm summer day. Most times now I let it warm for 2 or even 3 minutes before I turn it off, but I always ask myself does it feel like a warm summer day when I stick my hand in the oven to feel the warmth. If not let it cool down some.
That’s a great way to think of it, Anne, like a warm summer’s day. I’ve tried the oven trick so many times and it just never works for me, I always end up killing the yeast. I’ve found it to work quite well to put it in the bathroom with the heat on and the door closed. Baking bread in winter can be such a hassle, makes me miss summertime!
I’ve had a really quite funny flip of fortunes- When I started making artisan-esque bread, it turned out looking amazing but having no texture and tasting bland. Now, I use a recipe that uses a starter and turns out this bread that tastes awesome and you can see the gluten in it- but it simply refuses to rise once it gets to the oven, and turns out ugly. Fun fun fun.
The learning truly never ends! Breads with starters are SO tricky. I’ve been experimenting a lot with them too. I’m so glad there’s so much information online about bread baking!
what a great post! thanks for writing it all out. I just baked my first loaf today (yay!) and of course there were problems (it didn’t rise properly). This post encourages me to try it again – thank you! 🙂
I loved your post. I have this desire to make the perfect bread. So I used white wheat flour, new yeast, followed the directions and still failed! My first rising was good then put it in bread loaf shaped. It did not rise very well and when it was baked, it had a hole along the top inside. I live at about 5800 high altitude but wish I knew what I’m doing wrong. Any ideas?
I would try using plain white bread flour instead of white wheat flour for your first few times. I’ve found wheat bread to be tougher to get a good rise out of. Make totally sure you’re getting bread flour too, King Arthur Flour has a specific bread flour on the market that works great. As for the hole in the top, did you make sure to slash the top of the loaf before putting it into the oven? If you forget to do that, there’s no easy way for the steam to escape the loaf and for the dough to expand in the oven, so it kind of makes it’s own hole. There are so many things that can go wrong with baking bread, it’s kind of amazing how complicated it is. The only other thing I can suggest is to find a mentor who knows how to bake bread, or try to find some classes so someone can watch what you’re doing and correct as needed. Good luck to you, I hope you have delicious bread soon!
Thanks again for the wonderful insight. Do you have any suggestion is terms of salt called for in a recipe?
Many thanks for your great sharing! My dough has just flatten and inactive! Another unsuccessful bread proofing again!
Thanks for helping me understand that the longer you knead the better the bread will be. I guess I have to buy a kneader mixer for myself because my hands and arms can’t handle it. Ever since I was younger my arms don’t really have much strength, so I was not able to pass the cartwheel test. So now that I will be baking, it would help me best if I have a machine since the dough needs to be kneaded for a long period of time.
I found that my new oven has a bread proofing setting. I found it by accident while checking features. It works wonderful.
Oh that’s so cool! I didn’t know new ovens had this feature.